After my daughter was born, I became almost obsessive about protein. I was breastfeeding, sleep-deprived, and trying to figure out how to eat well without spending an hour in the kitchen. I started rotating through every dal I knew: moong, toor, chana. Somewhere in that postpartum haze, masoor dal became my quiet hero.
It cooks faster than any other lentil. No soaking. No fuss. A pot of it on the stove meant I had protein sorted for the next two days.
Then something funny happened. My daughter was maybe three when she picked up a book called Bilal Cooks Daal from the library. In the story, a little boy makes orange dal with his dad, and she was completely enchanted by it. “Mama, can we make the orange dal?” She had no idea she’d been eating it for months. We made it together that weekend, and now she calls it “Bilal’s dal.” It is, without fail, my easiest dinner-night fix for her.
This is that recipe. Nourishing, fast, and the kind of thing that becomes a weekly staple before you even realize it.
What Is Masoor Dal?
Masoor dal is the Hindi name for red lentils. When you see the split, hulled variety at the store, it’s that bright orange-pink color — those are the ones we’re using here. They’re also called dhuli masoor dal or lal masoor dal.
Split vs Whole Masoor Dal
The split and hulled version (what most recipes call for) cooks in under 10 minutes in a pressure cooker and turns beautifully creamy. The whole variety — brown on the outside, still with the skin on — takes longer and has a slightly earthier flavor. Both are delicious, but for this recipe we’re using the split kind.
Why You’ll Love This Recipe
- Cooks in 30 minutes, start to finish
- No soaking required
- Naturally vegan (use oil instead of ghee) and gluten-free
- High in protein and iron — great for vegetarian diets
- Kid-friendly: mild, creamy, and easy to pair with rice
- Makes excellent leftovers for meal prep

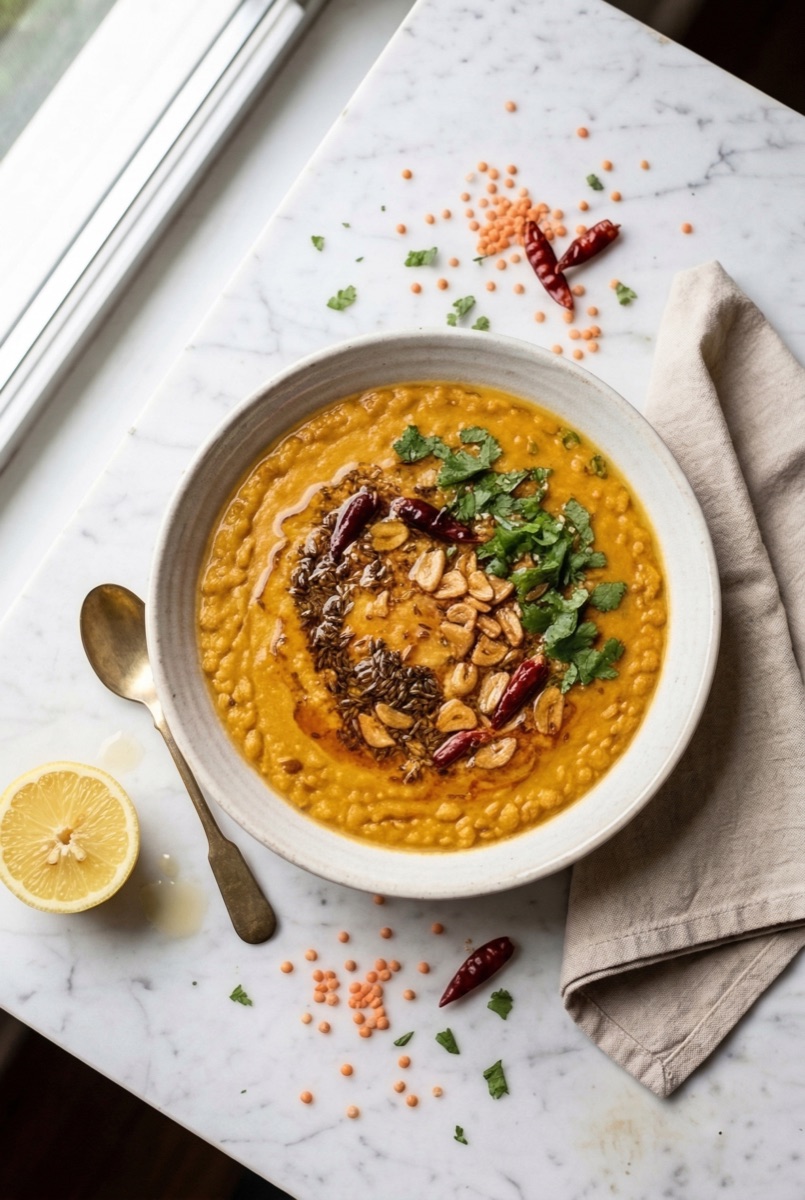
Easy Masoor Dal (Red Lentil Dal)
Ingredients
Equipment
Method
- Add rinsed masoor dal, water, turmeric, and 1/2 tsp salt to the Instant Pot inner pot. Stir.
- Close the lid and set the valve to sealing. Pressure cook on HIGH for 5 minutes.
- Let the pressure release naturally for 10 minutes, then do a quick release for any remaining pressure.
- Open the lid. The dal should be completely soft and slightly mushy. Stir and set aside.
- Add rinsed masoor dal, water, turmeric, and 1/2 tsp salt to a stovetop pressure cooker.
- Cook on medium heat for 4-5 whistles. Let the pressure drop naturally before opening.
- The dal should be soft and creamy. Mash lightly with the back of a spoon if needed.
- Heat ghee in a wide pan over medium heat. Add cumin seeds and let them sizzle for 30 seconds.
- Add garlic and dried red chilies. Sauté for about 1 minute until the garlic turns light golden.
- Add onion and cook, stirring often, for 4-5 minutes until caramelized and golden brown.
- Add ginger and cook for 1 minute.
- Add tomatoes and cook on medium heat for 5-6 minutes until they break down and the oil separates at the edges.
- Add Kashmiri chili powder and garam masala. Stir for 30 seconds.
- Pour the cooked dal into the pan. Add 1/2 cup water to adjust consistency. Stir well.
- Simmer on low heat for 3-4 minutes. Taste and adjust salt.
- Finish with crushed kasuri methi, fresh cilantro, and a squeeze of lemon. Serve hot.
Notes

Notes on Key Ingredients
Kashmiri red chili powder gives the dal its beautiful deep-orange color without too much heat. If you only have regular chili powder, use half the amount.
Kasuri methi (dried fenugreek leaves) adds a subtle, slightly nutty depth. I add it at the end, just before serving. It’s optional but worth keeping in your pantry.
Ghee vs oil: Ghee adds richness and brings all the flavors together in a way oil can’t quite match. That said, a neutral oil like avocado or sunflower works perfectly if you’re keeping it vegan.
How to Make Masoor Dal
Instant Pot Method
Step-by-Step Process
- Add rinsed masoor dal, water, turmeric, and 1/2 tsp salt to the Instant Pot inner pot. Stir to combine.
- Close the lid and set the valve to sealing. Pressure cook on HIGH for 5 minutes.
- Let the pressure release naturally for 10 minutes, then do a quick release for any remaining pressure.
- Open the lid. The dal should be completely soft and slightly mushy. Give it a stir and set aside.
- Heat ghee in a wide pan over medium heat. Add cumin seeds and let them sizzle for 30 seconds.
- Add garlic and dried red chilies. Sauté for about 1 minute until the garlic turns light golden.
- Add onion and cook, stirring often, for 4-5 minutes until caramelized and golden brown. Don’t rush this step. The sweetness of the onion is the backbone of the tadka.
- Add ginger and cook for another minute.
- Add tomatoes and cook on medium heat for 5-6 minutes until they break down and the oil starts to separate at the edges.
- Add Kashmiri chili powder and garam masala. Stir for 30 seconds.
- Pour the cooked dal into the pan. Add 1/2 cup water to adjust consistency. Stir everything together.
- Simmer on low heat for 3-4 minutes. Taste and adjust salt.
- Finish with crushed kasuri methi, fresh cilantro, and a squeeze of lemon. Serve hot.
Stovetop Pressure Cooker Method
- Add rinsed masoor dal, water, turmeric, and 1/2 tsp salt to a stovetop pressure cooker.
- Cook on medium heat for 4-5 whistles. Let the pressure drop naturally before opening.
- The dal should be soft and creamy. Mash lightly with the back of a spoon if needed.
- Follow steps 5-13 from the Instant Pot method above for the tadka.
Tip: Masoor dal cooks faster than most other dals — 4 whistles is usually enough. If you’re unsure, err on the side of one more whistle rather than undercooking.


Next, Pressure cook the dal.


Tips for the Best Masoor Dal
- Use fresh ginger and garlic. I know it’s tempting to reach for the jar, but fresh makes a real difference in dal. The raw pungency cooks off and leaves behind a clean, rounded flavor that paste just doesn’t deliver.
- Don’t skip caramelizing the onions. This is the step most people rush, and it shows. Golden-brown onions give the tadka its sweetness and depth. Give them 4-5 minutes on medium heat, stirring often.
- Adjust consistency at the end. Masoor dal thickens as it sits. Add a splash of water when reheating — it comes back together beautifully.
- Lemon at the end, not during cooking. Adding acid too early dulls the color. A squeeze right before serving keeps the dal bright and lifts all the flavors.
Variations
Gujarati-Style Masoor Dal
Lighter and simpler than the North Indian version. Skip the garam masala and onion. Use a tadka of mustard seeds, cumin seeds, hing (asafoetida), curry leaves, and a pinch of sugar. Add tomato and green chili. Finish with lemon. This is the version closest to what I grew up eating at home.
Jain-Friendly Masoor Dal (No Onion, No Garlic)
For Jain households or anyone avoiding onion and garlic: replace both with a generous pinch of hing (asafoetida) in the tadka. Use extra ginger and a green chili for flavor. The dal is still deeply satisfying — hing does more work than people expect.
Palak Masoor Dal (With Spinach)
Add 2 large handfuls of baby spinach to the dal in the last 2 minutes of simmering. It wilts quickly and adds iron, color, and a gentle earthiness. A great way to sneak greens in for kids. If you love the spinach-and-lentil combination, my spinach khichdi is another weeknight staple worth bookmarking.
What to Serve with Masoor Dal
Masoor dal is a complete meal with just steamed rice, but here are my favorite pairings:
- Jeera rice — the classic. Cumin-scented rice and creamy dal is a combination I could eat every day.
- Soft roti or chapati — for scooping. My daughter insists on this.
- Cooling cucumber raita — cuts through the warmth of the spices beautifully.
- Methi thepla — a Gujarati flatbread that pairs wonderfully with any dal.
- Papad and mango pickle for a proper thali spread.
Storage & Meal Prep
Masoor dal keeps well in the fridge for up to 3 days in an airtight container. It thickens considerably as it cools, so add a few tablespoons of water when reheating on the stovetop or microwave.
I often make a double batch on Sunday. It reheats in minutes and pairs with whatever grain I have on hand — rice, millet, or even quinoa. It’s one of the most reliable meal-prep staples in my kitchen.
Freezing note: I don’t recommend freezing masoor dal. The texture gets grainy after thawing, and it loses that fresh, creamy consistency. It’s best eaten within 3 days.
Nutrition Highlights
Masoor dal is one of the most nutrient-dense foods in a vegetarian kitchen:
- High in protein: ~18g per 100g dry lentils — one of the best plant-based protein sources
- Rich in iron: Important for vegetarians, especially women and those who are pregnant or postpartum
- High in fiber: Supports digestion and keeps you full longer
- Folate-rich: One cooked cup provides roughly 90% of the daily folate requirement, which matters especially postpartum and during pregnancy
- Naturally gluten-free and vegan
For vegetarians, dal isn’t just comfort food. It’s a genuine protein strategy.
FAQs
Is masoor dal vegan?
Yes, as long as you use oil instead of ghee for the tadka. The rest of the recipe is entirely plant-based.
What’s the difference between masoor dal and red lentils?
They’re the same thing. “Masoor dal” is the Hindi/Indian name; “red lentils” is the Western grocery store name. The split, hulled variety is what you’ll find labeled either way.
Can I make this without a pressure cooker?
Yes. Rinse the dal and soak it for 20-30 minutes first. Then cook in a pot with 3 cups of water on medium heat for 25-30 minutes, skimming any foam that rises. Once soft, proceed with the tadka as usual.
How do I make it Jain-friendly (no onion, no garlic)?
Skip both the onion and garlic entirely. Add a generous pinch of hing (asafoetida) to the hot ghee before the cumin seeds — it provides a similar savory depth. Use extra ginger and a green chili for brightness.
My dal turned out too thick. What do I do?
Just add water, a few tablespoons at a time, and stir over low heat. Masoor dal absorbs liquid as it sits, so this is completely normal. It doesn’t mean you overcooked it.
Can I add vegetables to this dal?
Absolutely. Spinach, diced tomatoes, and even grated zucchini work well. Add spinach in the last 2 minutes. Harder vegetables like diced potato or carrot can go in with the dal during pressure cooking.
Closing
Masoor dal is one of those recipes that earns its place in your weekly rotation quietly. You make it once for convenience, and then you keep coming back because it’s genuinely good. It’s nourishing, fast, and the kind of thing that tastes like home no matter how many times you’ve made it.
If you have a little one at home, I’d highly recommend the book Bilal Cooks Daal — it’s a beautiful story about a boy cooking with his dad, and it might just get your kid excited about orange dal the way it did mine.
Made this recipe? I’d love to know how it turned out. Leave a comment below and tell me — do you serve your masoor dal with rice or roti?
Made this? Share a photo and tag @petitepaprika on Instagram — I love seeing your kitchen creations!
