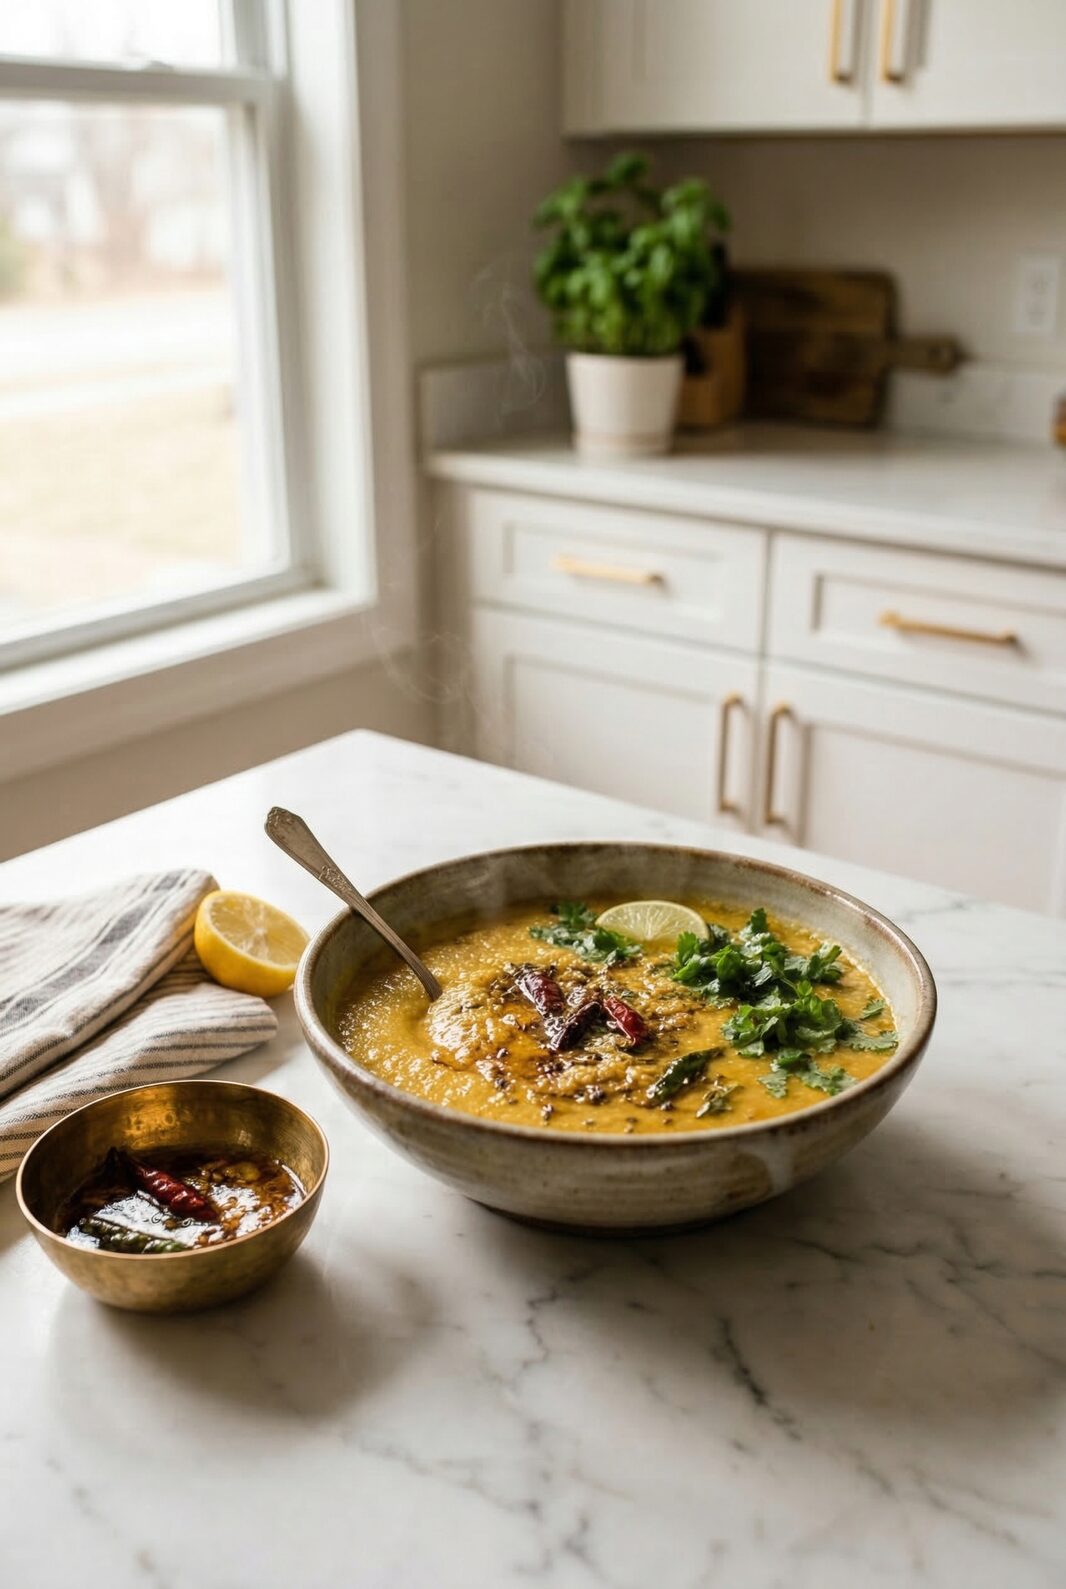
There is something about a bowl of yellow dal that feels like a hug at the end of the day. When we lived in Mumbai, our go-to order at the local dhaba was always dal tadka with a pile of hot rotis. The dal itself was smooth and comforting, but the real magic was the tadka: sizzling ghee, cumin, garlic, and red chilli poured over the top right before serving. You do not need a dhaba for that. You just need a good tadka.
This dal tadka recipe is the Punjabi restaurant-style version we make at home at least once a week. It uses toor dal (arhar dal) cooked until creamy, then finished with a hot tempering of cumin, garlic, and dried red chilli. Two steps: cook the dal, make the tadka. I often cook a big batch on Sunday and add a fresh tadka each time we eat it, so even on busy weeknights it tastes just-made. Let me show you how we do it.
What Is Dal Tadka?
Dal tadka is a North Indian lentil dish where cooked dal (split lentils) is topped with a tadka (tempering): whole or ground spices and aromatics bloomed in hot ghee or oil and poured over the dal at the end. The word “tadka” refers to that final step. It transforms a simple bowl of lentils into something fragrant and restaurant-worthy.
The classic lentil for this dish is toor dal (split pigeon peas), sometimes mixed with a little masoor dal (red lentils) or moong dal (split green gram) for extra creaminess. In Punjabi and dhaba-style cooking, toor dal is the default: it holds its shape slightly, cooks to a smooth consistency, and pairs perfectly with a garlic-and-cumin tadka.
If you already love our one-pot dal tadka or our Gujarati dal, think of this as the more traditional two-step version: dal cooked separately, then finished with a proper tadka right before serving. All three are weeknight staples in our house; we pick based on mood and how much time we have.
Why You’ll Love This Dal Tadka Recipe
I reach for this dal tadka when we want something familiar, filling, and a little special. Here is what keeps us coming back:
- ✓ Protein-rich and nourishing — toor dal delivers plant-based protein, fibre, and iron in every bowl
- ✓ Meal prep friendly — cook the dal ahead for this dal tadka and add a fresh tadka when you are ready to eat
- ✓ Vegan option — use oil instead of ghee and skip any cream; the flavour still shines in a vegan dal tadka
- ✓ Kid-friendly — keep the tadka mild (fewer or no dried red chillies, less garlic) and everyone can enjoy it
- ✓ Restaurant-style at home — the tadka is the whole point; once you nail it, you will make this dal tadka every week

Dal Tadka Ingredients You’ll Need
For the Dal
- Toor dal (arhar dal): 1 cup, rinsed well. This is the classic choice for Punjabi dal tadka.
- Water: 3 cups for pressure cooking (or 4 cups if cooking in a pot).
- Turmeric: 1/2 tsp.
- Salt: to taste (start with 3/4 tsp and adjust after the tadka).
- Optional: 2 tbsp masoor dal or moong dal for a slightly creamier texture; rinse and add with the toor dal.
For the Tadka
- Ghee or oil: 2 to 3 tbsp. Use oil for a vegan dal tadka.
- Cumin seeds: 1 tsp.
- Garlic: 4 to 5 cloves, finely chopped or crushed.
- Dried red chilli: 1 to 2, broken (or 1/2 tsp red chilli flakes). Skip or reduce for a mild version.
- Asafoetida (hing): a pinch (optional but traditional).
- Curry leaves: 5 to 6 (optional; adds a South Indian touch).
- Tomato: 1 small, finely chopped (optional; some homes add it to the tadka for a hint of tang).
To Finish
- Kasuri methi: 1 tsp, crushed (optional but recommended).
- Garam masala: 1/4 tsp (optional).
- Coriander leaves: 2 tbsp, chopped.
- Lemon juice: 1 tsp (optional).
- Cream or butter: 1 tbsp (optional; skip for vegan).
How to Make Dal Tadka
Step 1 — Cook the Dal
Rinse the toor dal (and masoor/moong if using) until the water runs clear. Add to a pressure cooker with 3 cups water, turmeric, and salt. Close the lid and cook on medium heat for 3 to 4 whistles, or in an Instant Pot on High Pressure for 8 to 10 minutes. Let the pressure release naturally for 10 minutes.
Open the lid and check the consistency. The dal should be soft and creamy. If it is too thick, add a splash of hot water and stir. Mash lightly with the back of a spoon for a smoother texture, or leave it slightly coarse if you prefer. Taste and adjust salt. Keep the dal warm while you make the tadka.
If cooking in a pot: Use 4 cups water, bring to a boil, then simmer partially covered for 45 to 55 minutes until the dal is tender. Stir occasionally and add more water if needed.
Step 2 — Make the Tadka
Heat ghee or oil in a small tadka pan or frying pan over medium heat. When it is hot but not smoking, add the cumin seeds and let them sizzle for 15 to 20 seconds until fragrant. Add the garlic and stir; cook for 30 to 45 seconds until it is golden but not brown. Add the dried red chilli(es), hing, and curry leaves (if using). If you are adding tomato, add it now and cook for 1 to 2 minutes until it softens. Turn off the heat.
The first time I made tadka I had the flame too high and the garlic turned bitter. Medium heat and a watchful eye make all the difference.
Step 3 — Combine and Serve
Pour the hot tadka over the dal. It will sizzle. Add kasuri methi, garam masala (if using), coriander leaves, lemon juice, and cream or butter (if using). Stir gently and let it sit for a minute so the flavours blend. Serve immediately with steamed rice, jeera rice, roti, or naan.


Dal Tadka Recipe (Punjabi Restaurant Style)
Ingredients
Equipment
Method
- Rinse the toor dal (and masoor or moong dal if using) until the water runs clear.
- Add to a pressure cooker with 3 cups water, turmeric, and salt. Cook on medium heat for 3 to 4 whistles, or in an Instant Pot on High Pressure for 8 to 10 minutes.
- Let the pressure release naturally for 10 minutes, then open the lid.
- The dal should be soft and creamy. If too thick, add a splash of hot water and stir. Mash lightly with the back of a spoon for a smoother texture. Taste and adjust salt. Keep warm.
- If cooking in a pot: use 4 cups water, bring to a boil, then simmer partially covered for 45 to 55 minutes until tender, stirring occasionally.
- Heat ghee or oil in a small tadka pan over medium heat until hot but not smoking.
- Add cumin seeds and let them sizzle for 15 to 20 seconds until fragrant.
- Add garlic and stir; cook for 30 to 45 seconds until golden but not brown.
- Add dried red chilli(es), hing, and curry leaves if using. If adding tomato, add it now and cook for 1 to 2 minutes until softened. Turn off the heat.
- Pour the hot tadka over the dal. It will sizzle.
- Add kasuri methi, garam masala (if using), coriander leaves, lemon juice, and cream or butter (if using).
- Stir gently and let it sit for a minute so the flavours blend. Serve immediately with steamed rice, jeera rice, roti, or naan.
Notes
Step-by-Step Process


Tips for the Best Dal Tadka
The difference between a flat bowl and a restaurant-style dal tadka usually comes down to the tadka. These are the rules I follow:
- Temperature: For dal tadka, the oil or ghee should be hot enough that the cumin sizzles as soon as it hits the pan, but not so hot that the garlic burns in seconds. Medium heat works best.
- Order of ingredients: Cumin first, then garlic, then dried chilli and aromatics. Adding garlic too early with high heat can make it bitter.
- Fresh tadka: If you have made the dal ahead, reheat the dal and make a fresh tadka right before you serve this dal tadka. The aroma and flavour are worth the extra two minutes.
- Reheating leftover dal: Add a splash of water when reheating (the dal thickens when cold). You can add a quick mini tadka on top after reheating to bring back the fresh taste of a just-made dal tadka.
What to Serve With Dal Tadka
Dal tadka is traditionally served with steamed basmati rice or jeera rice. In our house we often pair it with Instant Pot jeera rice when we want a full plate, or with methi thepla and a side of cucumber raita or cucumber peanut koshimbir for something light. If you like a complete thali, add a simple sabzi and you are set. For a lighter, one-bowl meal, try it with spinach khichdi on the side.
Dal Tadka FAQs
Q1. Is dal tadka vegan?
Yes, if you use oil instead of ghee and skip the optional cream or butter. The recipe works perfectly with any neutral oil (sunflower, peanut, or avocado). The flavour is still full and restaurant-style.
Q2. How do I store and reheat leftover dal?
Store in an airtight container in the refrigerator for up to 3 to 4 days. When reheating, add a splash of water and warm on the stovetop, stirring until smooth. For the best result, make a small fresh tadka and pour it over the reheated dal before serving.
Q3. Can I use only toor dal or do I need to mix lentils?
You can use only toor dal; that is the classic. Adding a small amount of masoor or moong dal (2 to 3 tbsp) gives a slightly creamier texture, but it is optional.
Q4. How do I make it mild for kids?
Use only 1 dried red chilli or skip it, and reduce the garlic to 2 to 3 cloves. You can also add the tadka to only one portion and leave the rest plain for little ones. Taste and adjust after the first time.
Q5. Why did my tadka taste bitter?
Usually the oil was too hot or the garlic was cooked too long. Next time use medium heat and add the garlic after the cumin has sizzled; cook just until golden, then turn off the heat.
Q6. Can I make the dal ahead and add the tadka later?
Yes. Cook and cool the dal, then store it in the fridge. When ready to eat, reheat the dal with a little water and make a fresh tadka to pour on top. This is how we do it for meal prep and it works beautifully.
This dal tadka recipe is one of those weeknight staples that never gets old. Once you get the tadka right, you will find yourself making it whenever you want a bowl of comfort that still feels a little special. If you try it, tell me how you like to serve yours: with jeera rice, plain rice, or roti? And do you go heavy on the garlic like we do? Leave a comment below. I love hearing how you cook at home.
Made this? Share a photo and tag @petitepaprika on Instagram. I love seeing your kitchen creations!
