There is something deeply comforting about the sizzle of batter hitting a hot tawa on a rainy morning. Growing up, these savory pancakes were my mom’s go-to breakfast when we needed something warm, filling, and quick before rushing off to school. Now, I make them for my own kids on busy weekday mornings, and the tawa barely cools down before the first batch disappears.
This moong dal chilla recipe is a staple in our kitchen. It is naturally gluten-free, packed with plant-based protein, and unlike traditional dosa, it requires absolutely no fermentation. You just soak the lentils, blend them with a few spices, and you are ready to cook.
What I love most about this recipe is how forgiving it is. You can sneak in a handful of grated veggies, add a crispy millet twist, or stuff it with paneer. Let’s make a batch together.
What is Moong Dal Chilla?
At its core, a chilla is an Indian savory crepe or pancake made from a lentil or flour batter. Moong dal chilla specifically uses split and husked yellow mung beans. It is light, nutritious, and a popular street food and home-cooked breakfast across North and Western India.
The Gujarati “Pudla” Connection
In our Gujarati household, we call these “pudla”. While pudla can be made with besan (chickpea flour) or a mix of lentils, the moong dal version is a favorite for its delicate flavor and crispy edges. We add a pinch of turmeric and fresh ginger, giving it that vibrant golden color and a subtle, warming kick. If you enjoy authentic Gujarati dal, you might also love our Mag Ni Chutti Dal — a similarly simple, nourishing recipe from the same tradition.
Ingredients You’ll Need
The ingredient list for the base batter is short and relies on pantry staples.
- Yellow Moong Dal: The star of the recipe.
- Aromatics: Fresh ginger, green chilies, and a pinch of asafoetida (hing) for digestion.
- Spices: Turmeric, cumin seeds, and salt.
- Water: Just enough to blend into a smooth, pourable consistency.
- Oil or Ghee: For cooking the chillas to crispy perfection.

Why Yellow Moong Dal?
Use split and husked yellow moong dal for this recipe, not whole green beans. Yellow moong dal blends into a silky smooth batter that spreads easily on the pan. It also gives the chilla its signature golden hue and light texture.
Nutrition Highlights
Why add moong dal to your daily meals? Here is a quick look at the benefits:
- High in plant-based protein: moong dal contains roughly 24g protein per 100g dry weight
- Rich in essential minerals including iron and magnesium
- Naturally gluten-free and vegan
- Easy to digest compared to heavier lentils, making it ideal for kids and light morning meals
This makes it a nourishing choice for vegetarian diets, keeping you full and energized throughout the morning.
How to Make Moong Dal Chilla (Step-by-Step)
Preparing the Batter
- Soak the dal: Rinse the yellow moong dal thoroughly until the water runs clear. Soak it in plenty of water for at least 3 to 4 hours. If I am planning ahead for breakfast, I leave it soaking in the fridge overnight.
- Blend: Drain the soaked dal completely. Transfer it to a blender along with roughly chopped ginger, green chilies, cumin seeds, and a little water.
- Check the consistency: Blend until you get a smooth paste. Transfer to a bowl and whisk in salt, turmeric, and asafoetida. The batter should look like pancake batter: thick but easily pourable.

Cooking to Crispy Perfection
- Heat the tawa: Place a well-seasoned cast iron pan or non-stick tawa over medium heat. Lightly grease it with a few drops of oil.
- Spread the batter: Pour a ladleful of batter into the center of the pan. Using the back of the ladle, spread it outward in a gentle, circular motion to form a thin 6-inch circle.
- Cook: Drizzle a little oil or ghee around the edges. Let it cook for about 2 to 3 minutes until the bottom turns golden brown and the edges start to lift.
- Flip: Carefully flip the chilla and cook the other side for another minute. Serve hot.
Pro-Tips for the Best Chilla
Getting the Consistency Right
If your batter is too thick, the chilla will be dense and hard to spread. If it is too thin, it will tear when you try to flip it. Start with very little water while blending, then add a tablespoon at a time until the batter coats the back of a spoon evenly.
How to Prevent Sticking on the Tawa
A common frustration is the batter sticking to the pan. Make sure your tawa is hot before pouring the batter, but turn the heat down to medium-low while spreading so the batter does not cook instantly and clump. I always wipe my cast iron tawa with a halved onion dipped in a tiny bit of oil before the first chilla. It creates a natural non-stick surface, and it actually works better than any spray.
Delicious Variations and Stuffing Ideas
The base recipe is fantastic, but chillas are essentially blank canvases.
Adding Veggies
This is my favorite fridge-cleanout trick. Add finely grated carrots, finely chopped onions, and a handful of chopped spinach directly into the batter. It is a great way to get picky eaters to enjoy their greens without any negotiation.
The Classic Paneer Stuffing
For a more filling meal, crumble some fresh paneer, mix it with chopped coriander, green chilies, and a pinch of chaat masala. Place a spoonful in the center of the chilla right before folding it over on the tawa.
The Petite Paprika Twist: Adding Millet Flour
To make the edges crispier and add a nutritional boost, whisk 2 tablespoons of jowar (sorghum) flour or besan into the blended batter. It absorbs excess moisture and gives the chilla a rustic, satisfying texture. This is the version I make most often now.
Serving Suggestions and Meal Prep
Perfect For…
- A quick, high-protein weekday breakfast
- A light weekend brunch paired with masala chai
- A savory snack for afternoon tea
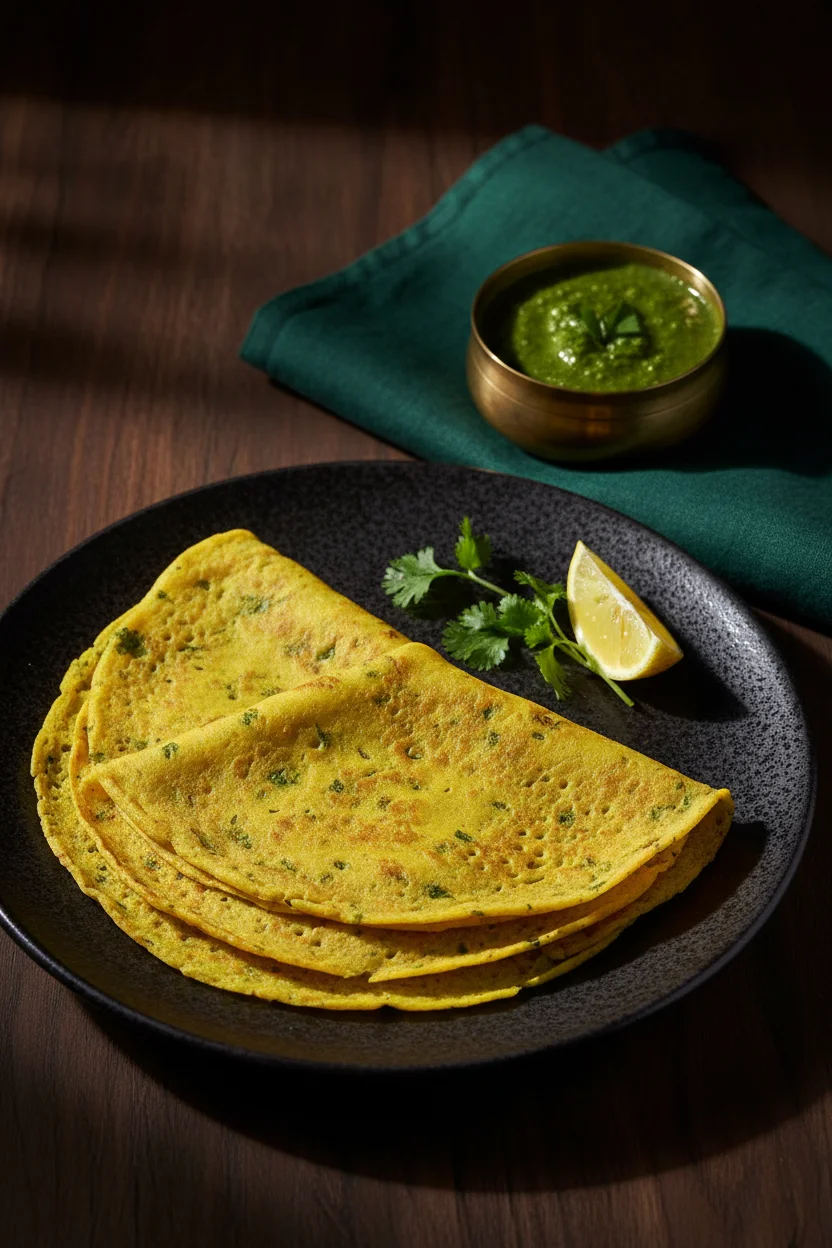
Serve your chillas hot off the pan with vibrant green chutney, sweet date-tamarind chutney, or a simple cooling cucumber raita.
Lunchbox and Make-Ahead Tips
Moong dal chilla makes an excellent lunchbox option alongside methi thepla. To keep them soft when packed for lunch, make them slightly thicker and use a little extra oil while cooking. Let them cool completely before packing so they do not get soggy.
You can store the blended batter in an airtight container in the refrigerator for up to 3 days. The batter may thicken slightly in the fridge, so stir in a splash of water before cooking.

Crispy Moong Dal Chilla
Ingredients
Equipment
Method
- Rinse the yellow moong dal 3 to 4 times until the water runs clear. Soak it in 3 cups of water for at least 3 hours, or overnight.
- Drain the water completely. Add the soaked dal, ginger, green chilies, and cumin seeds to a blender.
- Add 2 tablespoons of water and blend to a smooth paste. Add a little more water only if needed. The batter should be smooth, thick, but pourable.
- Transfer the batter to a mixing bowl. Stir in the turmeric powder, asafoetida, and salt.
- Heat a tawa or flat skillet over medium heat. Lightly grease it with a few drops of oil and wipe with a paper towel.
- Pour a ladleful (about 1/4 cup) of batter into the center of the pan. Working quickly, use the back of the ladle to spread the batter outward in a circular motion to form a 6-inch crepe.
- Drizzle about 1/2 teaspoon of oil or ghee around the edges and a little on top. Let it cook for 2 to 3 minutes until the bottom is golden brown and crispy.
- Carefully slide a spatula under the chilla, flip it, and cook the other side for 1 to 2 minutes.
- Remove from the pan and repeat with the remaining batter. Serve hot.
Notes
FAQs
Can I make this vegan?
The batter itself is completely vegan. Just use oil instead of ghee for cooking.
Can I use green moong dal instead?
Yes, but the texture and color will be different. Whole green moong or split green moong with the husk creates a denser, earthier pancake. Yellow moong dal is preferred for a light, smooth, classic chilla.
Do I need to ferment the batter?
No. Unlike dosa or idli batter, moong dal chilla batter requires no fermentation. You can blend and cook it immediately after soaking.
Why are my chillas sticking to the pan?
This usually happens if the pan is not hot enough, or if it lacks a light coating of oil. Make sure the pan is well-seasoned and hot before pouring. Lower the heat slightly while spreading the batter.
How do I store leftovers?
Store uncooked batter in an airtight container in the refrigerator for up to 3 days. For cooked chillas, wrap in a paper towel and store in an airtight container in the fridge for up to 2 days. Reheat on a warm tawa before serving.
Bring Comfort to Your Morning
These moong dal chillas are proof that a nourishing, protein-packed breakfast does not have to be complicated. Whether you are making them for a quiet weekend brunch or packing them into a lunchbox, they bring wholesome comfort to your day. For more high-protein vegetarian ideas, browse our iron-rich vegetarian recipes collection.
If you try this recipe, leave a comment below and tell me: do you prefer your chilla plain, loaded with veggies, or stuffed with paneer?
Made this? Share a photo and tag @petitepaprika on Instagram. I love seeing your kitchen creations!
